Wednesday, July 28, 2010

Konsep: Application server

Siapapun yang belajar Java pasti tahu sebuah program Java dimulai dari main, misalnya seperti ini:


Menurut penjelasan di buku, setelah source code (.java) di-compile menjadi bytecode (.class), kita tinggal menjalankannya dari command prompt dengan perintah:

java Kelasku

Lalu apa gunanya application server seperti Apache Tomcat? Bukannya kita tinggal membuka port 80 dari dalam main? OK, anggaplah kita memulai semua dari nol alias "semuanya kita yang mengurus", maka program yang kita buat harus:

  1. Membuka server socket yang mendengarkan port 80 (HTTP).
  2. Ketika seseorang membuka http://alamat_kita, program kita harus tahu cara membaca request tersebut. Dengan kata lain, program kita harus mengimplementasikan protokol HTTP.
  3. Memproses request tersebut sesuai logika bisnis yang kita miliki, misalnya mengambil data dari database atau menghitung bonus penjualan.
  4. Mengembalikan respon, misalnya menghasilkan halaman berikutnya.

Perlu diingat, program tersebut harus bisa "salome"—satu lubang (port) ramai-ramai, karena "http://alamat/admin" dan "http://alamat/" mungkin ditangani oleh program yang berbeda (namun keduanya berada di port 80). Program yang kita buat juga harus mendukung multi-theading agar bisa diakses serempak oleh banyak orang. Terlihat ribet kan?

Itulah gunanya application server. Kita tidak perlu repot membuat semua dari awal. Yang perlu kita lakukan adalah membuat program sesuai "perjanjian", dalam hal ini kita membuat Servlet. Urutannya menjadi:

  1. Ada request masuk.
  2. Dilihat apakah ada program ("webapp") yang di-setting untuk menangani request ini.
  3. Kalau tidak ada, tampilkan pesan kesalahan.
  4. Kalau ada, panggil fungsi doGet/doPost dari program tersebut (yang merupakan sebuah Servlet), sambil memberikan data-data dari request.
  5. Kembalikan hasil pemrosesan poin 4 ke sumber yang meminta request.

Pemrograman Web menggunakan teknologi Java selalu seperti ini. JSP, JSF, Struts, Spring MVC dan berbagai framework lainnya adalah "teknologi tambahan" yang berjalan di atas Servlet. Untuk alasan mengapa menggunakan framework dapat dilihat di blog sebelumnya.

Selain fungsi dasar di atas (melayani HTTP request), biasanya application server juga ada plus-plusnya. Umumnya program kita membutuhkan koneksi ke DB, sehingga application server menyediakan fungsi untuk itu. Application server juga mungkin menyediakan fungsi untuk mengirim email. Application server yang menyediakan fungsi-fungsi itu biasanya disebut "application server", sedangkan application server yang basic biasanya disebut "servlet container".

Tuesday, July 27, 2010

Konsep: IDE

Coba lihat dapurmu. Umumnya sebuah dapur berisi peralatan standar seperti kompor, kulkas, oven, tempat mencuci piring, tempat menaruh piring, dan lain sebagainya. Kalau dapurmu bergaya barat, mungkin tata letaknya akan seperti gambar ini:


Di dapur seperti ini urusan masak-memasak menjadi lebih nyaman. Semua di satu tempat. Itulah gunanya IDE (Integrated Development Environment) dalam membuat program.

Tentu, kita bisa coding hanya dengan Notepad dan command-line tool dari SDK pilihan kita (misalnya Java Development Kit). Kita juga bisa masak tanpa dapur yang lengkap seperti gambar di atas. Tapi mana yang lebih nyaman?

IDE yang bagus juga bisa dikustomisasi, misalnya tata letak panelnya diganti, sama seperti dapur yang lokasi kulkas dan kompornya sesuai selera orang yang menggunakannya.


Di dunia Java, ada beberapa IDE yang populer, misalnya Eclipse, NetBeans dan IntelliJ. Dua yang pertama gratis. Mana yang lebih baik? Seperti soal dapur, semua kembali ke selera. Umumnya pemula lebih menyukai NetBeans karena "semua tinggal pakai". Eclipse biasanya dipilih karena banyak pilihan plugin dan lebih ringan. IntelliJ tetap menjadi favorit bagi yang tidak keberatan membayar.

Namun demikian, meskipun dapur kamu keren banget, tetap sang koki dan bumbu masaknya yang menentukan masakan itu enak atau tidak. Demikian juga dalam membuat program. Meski IDE-nya canggih, tetap programmer dan API-nya (Application Programming Interface) yang menentukan program yang dihasilkan bagus atau tidak.

Mixed language, campur sari

Those who follow my old technology blog know that most of the time I wrote posts in English. It serves two purposes: targeting wider audience and building my reputation. But the majority of people in my country don't speak English and have a hard time understanding topics written in English, so I left them in the cold. Since my motivation of blogging is also to help my people, I decided to blog:

- basic, conceptual topics in Bahasa Indonesia
- advanced and trending topics in English

Why the "easy" part in Bahasa Indonesia? From my observation, most "newbie" questions are centered around concepts and how to get started. By taking this approach, I hope I can satisfy both sides.

Tuesday, July 13, 2010

Beginning GWT UiBinder

Those who (want to) use Google Web Toolkit (GWT) and following its development must have known that starting version 2, GWT supports declarative (e.g. using markup a'la HTML) user interface building. That technology is called UiBinder.

I'm having a hard time understanding the technology, so I'm going to blog my experience to get a better understanding. Feel free to drop comments so we can learn together.

So what is UiBinder? UiBinder is a feature of GWT to build the "view" (things that are shown to user) of our GWT applications using XML/HTML instead of Java code. You can still use the old way (code) if you want to (e.g. you're a Swing developer).

Let's get down with example. I'm going to build a Web page like this:


I'm using Eclipse with Google Plugin, but basically you can use any IDE (actually I use IntelliJ more). Let's create a new Web Application Project named uibinder-demo.


You can use any package (mine is com.wiradikusuma.tutorial.uibinder), but don't check "Use Google App Engine"—I'm just going to focus on GWT. Click "Finish" to have everything generated, then click the green "play" icon to run it (or right click on the project, "Run As -> Web Application"). Open your browser and verify that your application is indeed running. Good, leave the server running.

Now we're going to add some UiBinder stuff. Open Uibinder_demo.html and empty its body element:


Right click on package com.wiradikusuma.tutorial.uibinder.client and create a new UiBinder named Main. Make sure the UI is based on "GWT widgets" and "Generate sample content" is checked. Click "Finish". Open Uibinder_demo.java in the editor and replace the contents of onModuleLoad to:


Refresh your browser and see that the view has changed to something simpler. Now open Main.ui.xml and replace its contents with this:


Refresh your browser again. Sweet. Now you might be wondering, "Can you show me the Java code equivalent?" Sure! Let's revisit Uibinder_demo.java in the editor and replace the contents of onModuleLoad to:


Refresh your browser and see the same layout, except the content is now Yahoo homepage (to show that we're actually looking at the Java code version). Nice. Let's revert our changes. Open Uibinder_demo.java in the editor and replace the contents of onModuleLoad back to:


So far our useless webapp is working, but ugly. Let's put some style. Open Main.ui.xml and insert the following code just before g:docklayoutpanel:


As you can see, it's pretty much standard CSS. Let's apply the header class:


And the footer class:


Refresh your browser. You can see it's now styled (still ugly, but you get the picture).

Monday, July 5, 2010

DisplayTag and SiteMesh

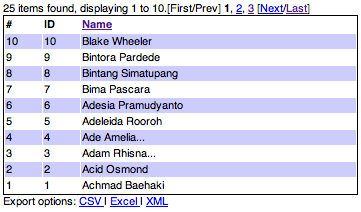
A friend of mine asked how to use DisplayTag in a Spring-powered webapp decorated with SiteMesh. DisplayTag has been around for a long time and its development has been stopped, but it's still a useful library if you want to quickly generate fancy tables in JSP. This short tutorial's objective is to make something like this:


I assume you're familiar with Java webapps and know to use Maven. Let's get started. First create a webapp project using Maven archetype:

mvn archetype:create -DgroupId=com.wiradikusuma.tutorial -DartifactId=displaytag-sitemesh-demo -DarchetypeArtifactId=maven-archetype-webapp

Edit the generated pom.xml by adding dependencies to Servlet API, JSP API, Spring MVC, SiteMesh and DisplayTag. We don't really need Spring for this very simple demo, but I include it anyway since most likely you will use it in your real webapps. The resulting pom.xml should look like this:


Don't forget to adjust your web.xml to include Spring and SiteMesh:


As for the table itself, here's the code:


name is the model name specified in IndexController. id is to specify variable name for each row (e.g. so you can do ${data.name} inside display:column). export means you want it to allow exporting. requestURI is required if your JSP file is not directly mapped to URL (e.g. stored inside WEB-INF).

You can download the self contained final project here. You can open it from Eclipse (with Maven plugin installed), IntelliJ or NetBeans IDE.

Java stuff moved here

This is stupid. I forgot the password to my JRoller account so I can't update my Java-related blog. After weeks of googling and asking without result, I came to conclusion that maybe I should start a new blog.

So I created a blog in WordPress, mainly because it is visually appealing. But then I hit a roadblock when I wanted to put SyntaxHighlighter JavaScript code to my HTML. Apparently in free hosted Wordpress you can't do this. There are some WordPress plugins for syntax highlighting, but they won't work in hosted Wordpress—you have to host it yourself. Ouch.

So I go back to good ol' Blogger. And apparently they have this new thing called Template Designer. Sweet!